
Training Tools
The GESEA Educational Programme implements a series of training tools to increase the practical skill level needed by endoscopic surgeons to correctly perform basic endoscopic procedures.
Every endoscopic surgeon needs a minimum of practical skill lab training before going into the operating room. It is scientifically proven that this improves endoscopic surgical performance in the operating room, increases patient’s safety and enhances the surgical learning process.

LASTT
Laparoscopic Skills Training and Testing method
LASTT is a validated practical test to measure the competence level of an individual in basic laparoscopic psychomotor skills in the specific uterine environment: camera handling, hand-eye coordination and bi-manual coordination.
It uses the LASTT model, representing the spatial distribution and orientation of the different planes and angles of a female pelvis, which is placed in a pelvic trainer.
LASTT is one for the three exercises as used in the practical skill assessment of the GESEA Programme. The LASTT Training Package is available from ID Trust Medical.
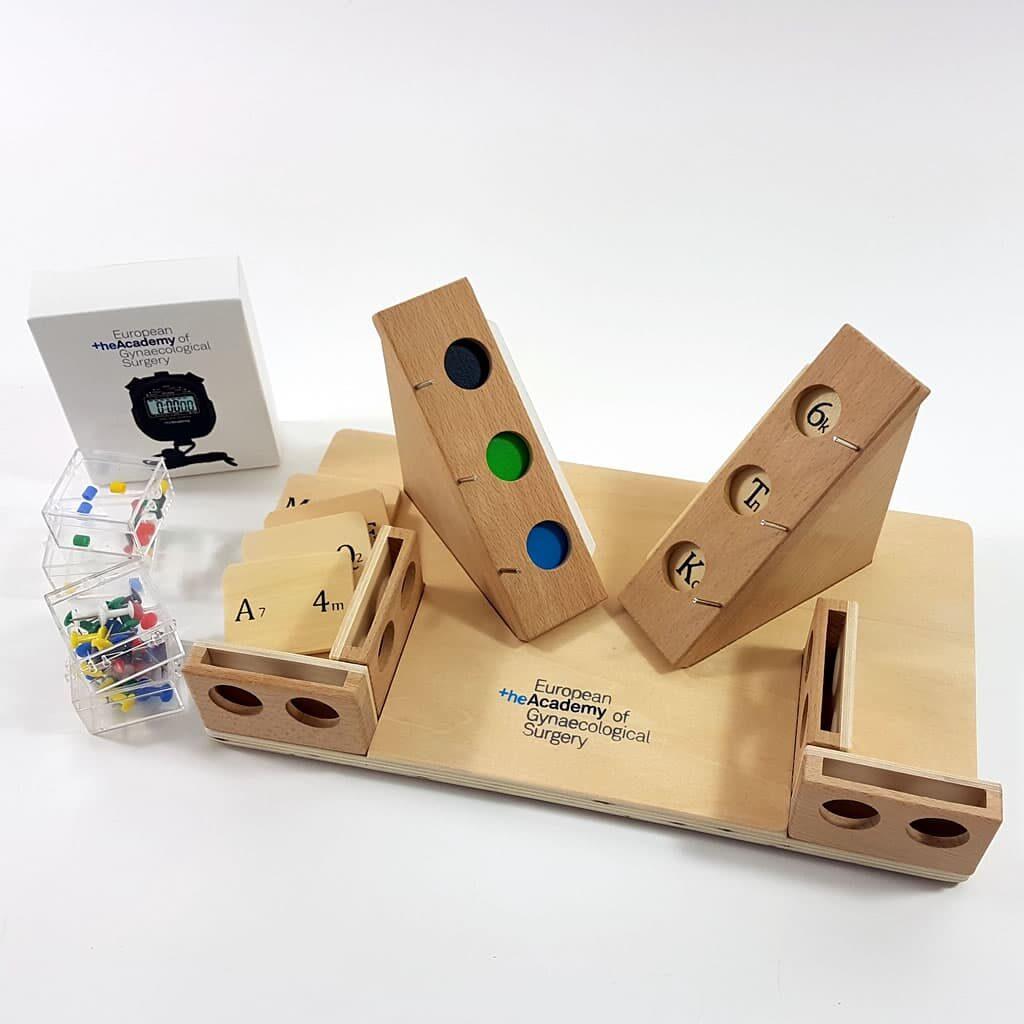
Exercise 1: Camera Handling
The aim of the first exercise is to navigate the camera with the 30° optic to visualise all important areas of the pelvis.
Procedure:
- Start your search by locating the first position “1a”
- Zoom in to position the target circle on the small character so that it is fully shown and readable
- Only proceed when your partner can read the small character
- Search and locate the corresponding capital character (A)
- Continue this sequence until you reach the last position with small character ‘end’
Exercise 2: Hand-eye Coordination
The aim of the second exercise is to evaluate the ability to navigate the camera with the non-dominant hand and to handle a forceps with the dominant hand.
Procedure:
- Position one corresponding coloured ring on each nail
- If you drop an object, you can use the second ring or you may re-grasp, as long as you can find the object within the endoscopic boundaries
Exercise 3: Bi-manual Coordination
The aim of the third exercise is to evaluate the ability to handle two forceps simultaneously with the dominant hand and the non-dominant hand.
Procedure:
- Position one coloured pin in each corresponding circle
- Grasp plastic part of the pin with non-dominant hand and lift pin up
- While elevated, pass the pin to the dominant hand by grasping the metal part of the pin
- Place the pin in the corresponding coloured circle and repeat for all colours
- If the pin is dropped, use the second pin
SUTT
Suturing and knot tying Training and Testing method
SUTT is a practical test consisting of a series of exercises on stitching and knotting to assess, independent of the medical skills, the required quality levels of suturing skills. It measures the ability of fine and complex motor skills by performing correct stitches and intra-corporeal knots.
It uses the SUTT model consisting of a SUTT Foam Base and SUTT Pad, which is placed in a pelvic trainer.
SUTT is one for the three exercises as used in the practical skill assessment of the GESEA Programme. The LASTT Training Package is available from ID Trust Medical.

SUTT1
The aim of SUTT1 is to measure the ability of fine and complex psychomotor skills by performing stitches using correct needle handling and intra-corporeal knot tying.
Procedure:
- Perform 4 single stitches using your dominant hand and 1 stitch with an intra-corporeal knot
- Pass the suture by entering and exiting precisely within the black dots
- Leave enough thread in the pad for evaluation
- Cut off using laparoscopic scissors
SUTT2
Stitching Greek Suture
Loading the needle with both hands starting to pass the needle through the red dot – running the suture until the last black dot. Alternating stitching hand after each 2 dots. Passing the tissue with a precise entry and exit in the centre of the dots. Manipulation of the thread, avoiding to tear the tissue.
Stitching and knot tying with right hand
Precise positioning of stitch on the predefined entry (red dot) and exit point (black dot). 1 Intra-corporeal knot with double flat knot, 1st locking sequence and 2nd locking sequence. The exercise is being timed till the participant releases the thread at both ends at the end of the knotting movements.
Stitching and knot tying with left hand
Precise positioning of stitch on the predefined entry (red dot) and exit point (black dot). 1 Intra-corporeal knot with double flat knot, 1st locking sequence and 2nd locking sequence. The exercise is being timed till the participant releases the thread at both ends at the end of the knotting movements.
Stitching, tissue approximation and knot tying with dominant hand
Precise positioning of stitch on the predefined entry and exit point with dominant hand. Correct approximation of tissue by performing an intra-corporeal double flat knot with 2 locking sequences. The exercise is being timed till the participant releases the thread at both ends at the end of the knotting movements.
HYSTT
Hysteroscopic Skills Training and Testing method
HYSTT is a practical test to measure the competence level of an individual in basic hysteroscopic psychomotor skills (HPS) in the uterine environment. These typical skills need to be applied in a ‘key-hole’ situation, such as camera navigation and hand-eye coordination.
It uses the HYSTT model, representing the spatial distribution and orientation of the different planes and angles of a normal uterus, which is placed in a female genital model.
HYSTT is one for the three exercises as used in the practical skill assessment of the GESEA Educational Programme.
HYSTT1 & HYSTT2 | Exercise 1: Camera Navigation
The aim of the first exercise is to navigate the camera with the 30° optic to visualise all important areas of the uterine cavity.
Procedure:
- Start your search by locating the first position 1a
- Zoom in to position the target circle on the small character so that it is fully shown and readable
- Only proceed when your partner can read the small character
- Search and locate the corresponding capital character (A)
- Continue this sequence until you reach the last position with small character ‘end’
For HYSTT2, the correct position of the camera and the light cable is validated at each step.
HYSTT1 | Exercise 2: Hand-eye Coordination
The aim of the second exercise of HYSTT1 is to evaluate the skills of simultaneous camera handling and handling a hysteroscopic forceps, grasping an object and transporting it.
Procedure:
- Mentor states a colour of pin to collect as identified on the sequence sheet
- Pins are left the cavity
- Continue until all 14 pins have been taken from the uterine wall and placed in the cavity
HYSTT2 | Exercise 2: Hand-eye Coordination
Exercise is performed at slow pace for demonstration purposes
The aim of the second exercise of HYSTT2 is to evaluate the skill level of simultaneous camera and forceps handling by grasping an object and transporting it, while keeping an eye on the camera and light cable. The focus of this exercise lies on its correct execution. Anatomic and camera errors, as well as trauma are parameters that have a significant impact on the scoring.
Procedure:
- Mentor names a position (Cornua, Mid or Isthmus) and a colour (black, red, blue or yellow) according to the sequence on the scoring sheet
- Mentee locates the pin and positions the instrument to take the pin out
- After verification of the location, colour and camera position, the pin can be extracted
- Continue until all 12 pins have been removed from the cavity